After we bought our current home, we discovered that our next door neighbor happens to be my mom’s cousin’s son (what’s the proper term for that? I have no idea). I also happened to grow up down the road from him, so it was a neat coincidence.
What wasn’t so neat, though, was the view through our dining room window. Our neighbors are great, but staring at their roof every day? Not so much.
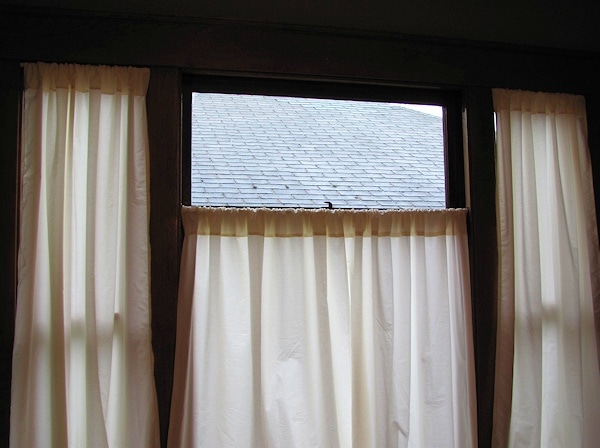
Our home has two beautiful leaded glass windows, and the small top window in our dining room looked like a prime location for more leaded glass, but it was just plain. I presume that’s because the window below used to be operational, and the motion would have shattered a fragile leaded glass window.
I looked into a few different options to obscure the view in a way that looked nice from inside. Of course I could have covered it with curtains, but I wanted to highlight what little architectural interest there was in that location. Window film is pricey, and the stained glass or leaded glass styles that I preferred didn’t come in a suitable size, nor did they match the character of my home. Real leaded glass was prohibitively expensive.
I didn’t want to invest too much money because, eventually, we will be replacing these drafty old windows anyway. I wondered if I could somehow fake leaded glass, but I wasn’t sure what kind of materials I could use.
Finally, I happened to find a tutorial showing how to use Plaid brand Gallery Glass products to create very convincing faux leaded glass. The project was inexpensive and easier than I expected. For less than $20 and with a few hours of work, I was able to create a beautiful window design that obscures the “scenery” outside and flows well with the original details in my 1918 home.
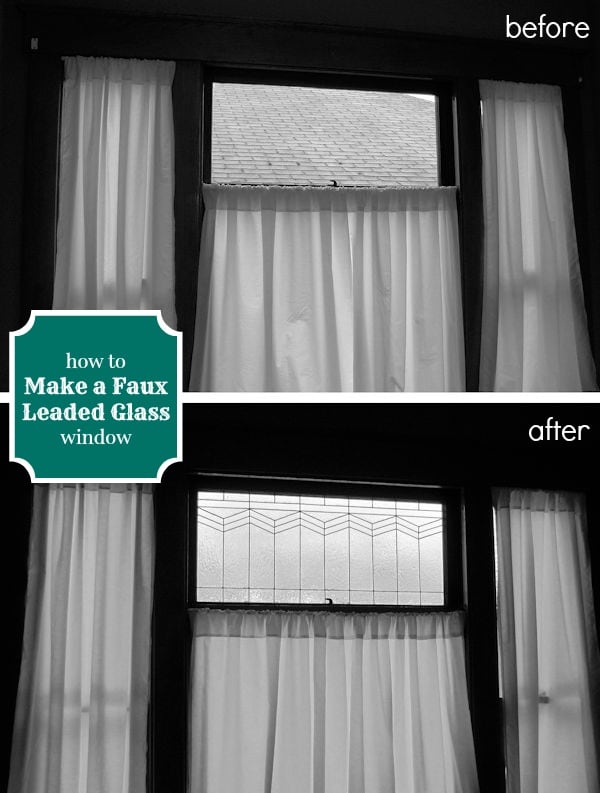
I thought I’d walk you through the steps in detail in case you want to give it a try — I bet you’ll be looking for any excuse to try it once you see how easy it is. My husband says he’s expecting to come home to Sainte-Chapelle one of these days.
Materials
Plaid Gallery Glass products are easy to find in major craft stores or online. I used the following products for my window, which is approximately 38 inches wide by 16 inches high:
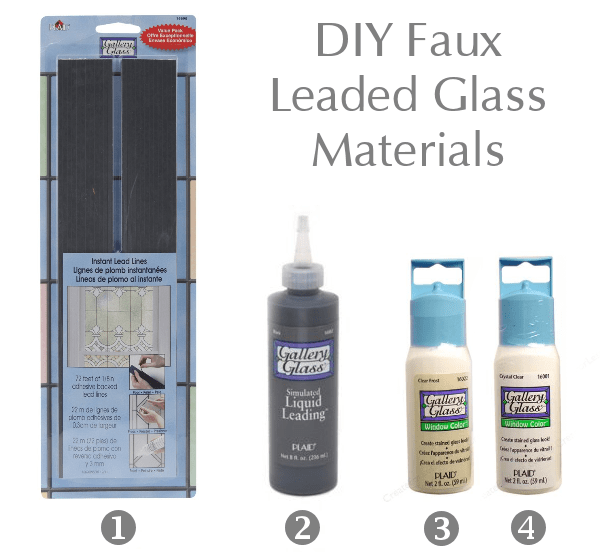
1. Gallery Glass Redi-Lead Instant Lead Lines Value Pack 2. Gallery Glass Liquid Leading 3. Gallery Glass Window Color in Clear Frost 4. Gallery Glass Window Color in Crystal Clear
The leading strips were the most expensive item on the supply list, but I was able to spend less by using one of the ubiquitous 40% coupons that stores like Jo-Ann, Hobby Lobby and Michaels offer regularly. I purchased one value pack of leading strips, one 2-fl. oz. bottle of Liquid Leading, one 2-fl. oz. bottle of Clear Frost paint and two 2-fl. oz. bottles of Crystal Clear for just under $20 at Hobby Lobby (Note: I’m linking to Amazon in this post, but check out craft stores first if you can — the in-store prices are much better, especially with a coupon).
Gallery Glass window paint comes in a wide variety of other colors as well if you want to create a faux stained glass look.
In addition to these supplies, I also used a utility knife to cut the leading strips, a ruler, a measuring tape, a small paint brush and some q-tips, all of which I already had on hand.
Note: I had a good question from a reader and wanted to clarify in case anyone else is wondering. The leading strips mentioned above do not contain any real lead, and they are completely safe to handle.
Step 1: Develop a Design
I wanted my new window to match the styles of the two existing leaded glass windows in my house.
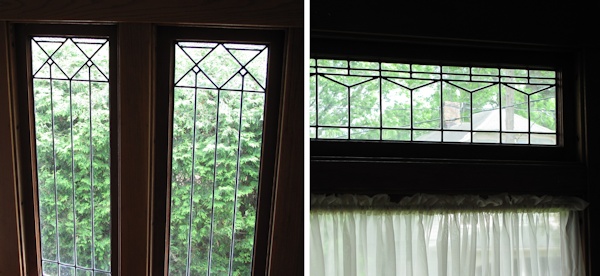
I searched online to find other examples of leaded glass from the time period, and found one particular design that had many of the same elements, but was a little bit more ornate.
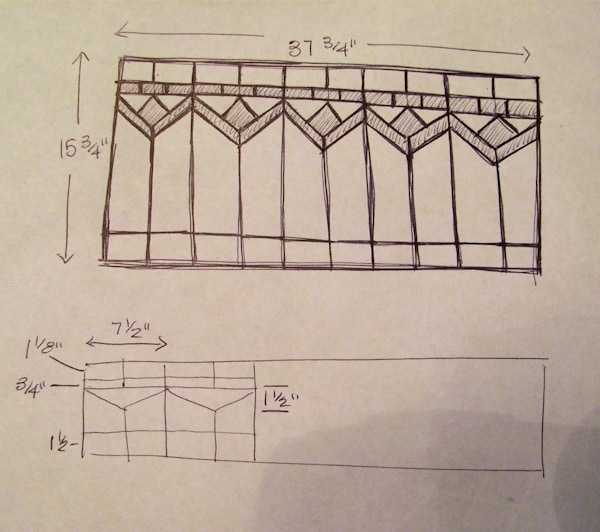
I sketched the proposed design, and then sketched the existing window I have in my living room to get some proportions. I ended up simplifying my proposed design quite a bit after I started applying the design to the actual window — it proved a little bit too elaborate, and I didn’t care for the look. I decided in this case that less is more.
Step 2: Measure and Apply Leading Strips
First, I cleaned the window thoroughly with window cleaner to ensure that the materials would adhere properly. Once I had developed my design and worked out the dimensions, I began to cut pieces of flexible faux leading strips and apply them to the window. There wasn’t an easy way to transfer the pattern to the window, so I used lengths of line segments and points as a guide.
I ran into a small problem almost immediately — after applying four horizontal line segments at the top of the window, the fifth section didn’t fit. Had I measured incorrectly? I was scratching my head for a while until I realized that the strips had stretched a bit as I pulled them off the backing. From then on I measured, cut, applied the strips, and then re-measured and used a utility knife to trim off the excess. I was back in business.
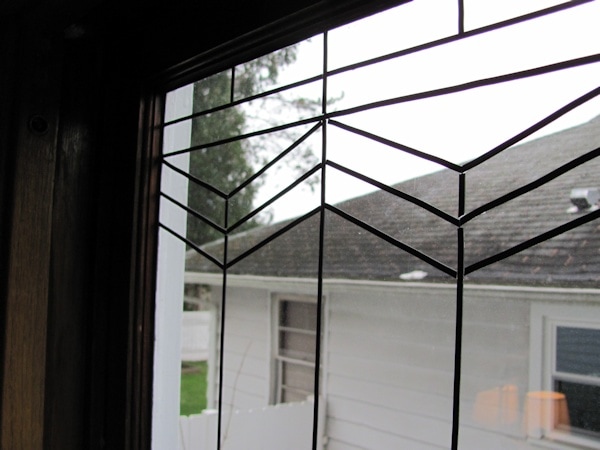
The leading strips are very easy to use, and can be removed and re-positioned if needed.
Step 3: “Solder” Joints with Liquid Leading
Once all of the leading strips were applied to the window, I used Liquid Leading to fill in the gaps.
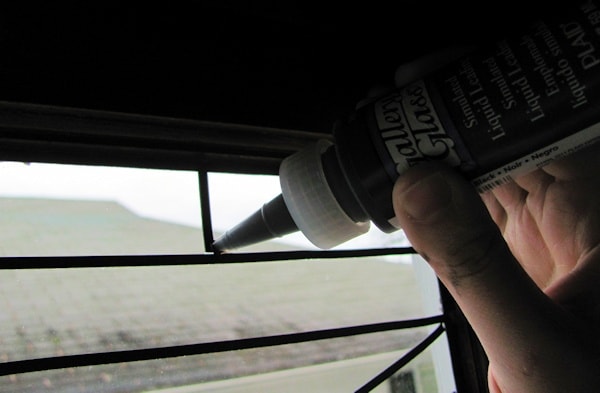
It’s similar in consistency to fabric puffy paint and really lends an authentic look to the leading work. Allow it to dry completely before proceeding.
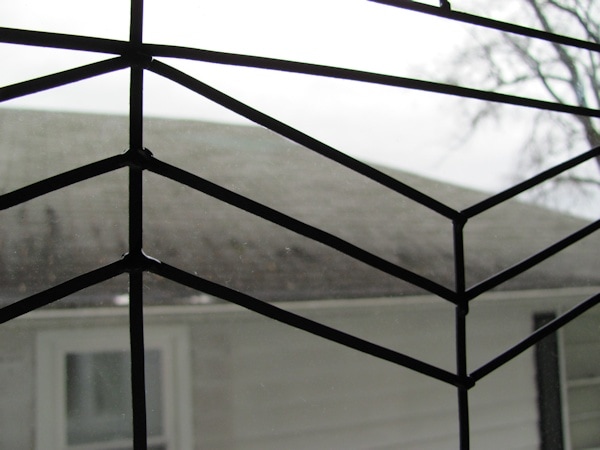
Step 4: Apply Frosted Glass
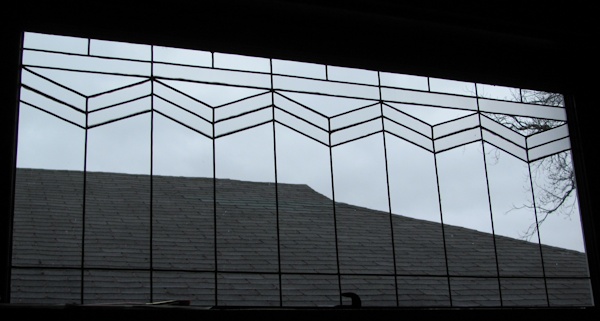
I thought it would be nice to use different textures on my window, so I decided to use a mix of frosted glass and pebbled glass. I used Gallery Glass in Clear Frost to paint the flower portions of my design. I wanted the frosted sections to be smooth, so I used a paint brush to apply. If you look closely you can see brush strokes, but from a distance it does look like smooth frosted glass.
Step 5: Apply Pebbled Glass
The bulk of the project was filling in the textured glass portions, for which I used Gallery Glass in Crystal Clear. There are different ways to achieve texture. The instructions suggest using the tip of the paint bottle to swirl the paint around, but the examples I saw weren’t exactly the look I was going for. I ended up using my finger to blot the paint after spreading a thin layer over each pane, which created a fairly uniform texture in keeping with the real glass in one of my original windows.
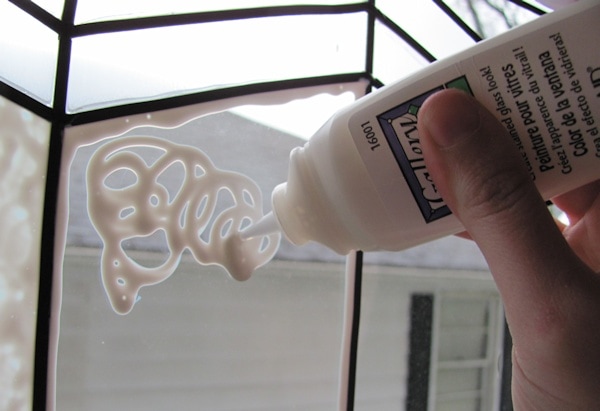
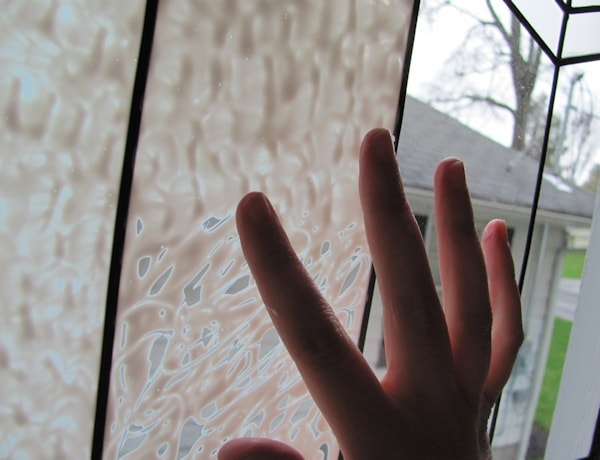
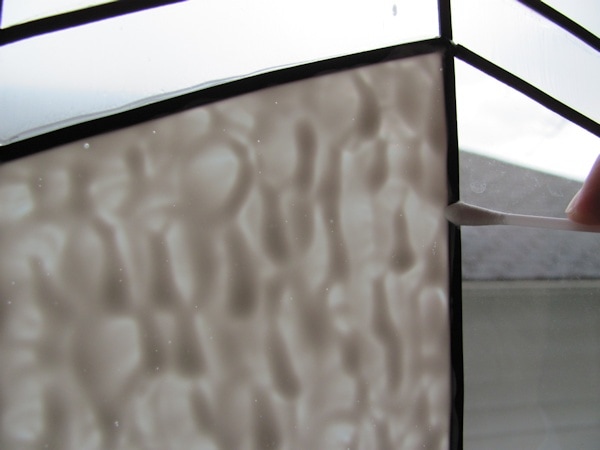
Working on a vertical surface was a little bit tricky. If I used too much paint, it would flow down the window and make a mess. It took a little trial and error to determine the right amount, and I learned not to bother outlining the bottom edges of the window panes. Although the paint dries completely clear, I didn’t want the leading strips to look shiny, so I went through with q-tips to clean up the lines before the paint dried.
Step 6: Allow to Dry
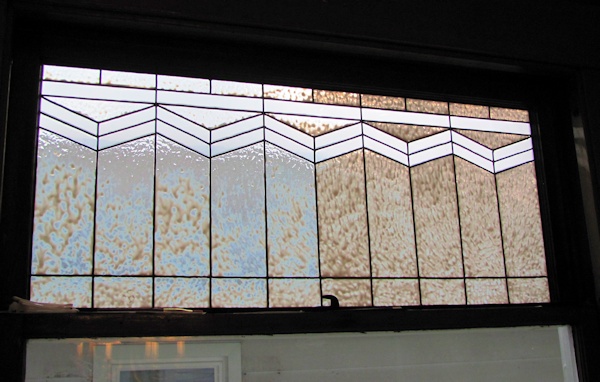
Drying time varies depending on how thickly the paint has been applied. My frosted glass sections dried very quickly. The clear textured glass began to dry quickly, but the thicker areas took several hours. The paint is similar to glue — it starts out white and then clears as it dries. In the picture below, the paint on the left has been drying for several hours, while the paint on the right is fresh. The thickest areas take the longest to clear.
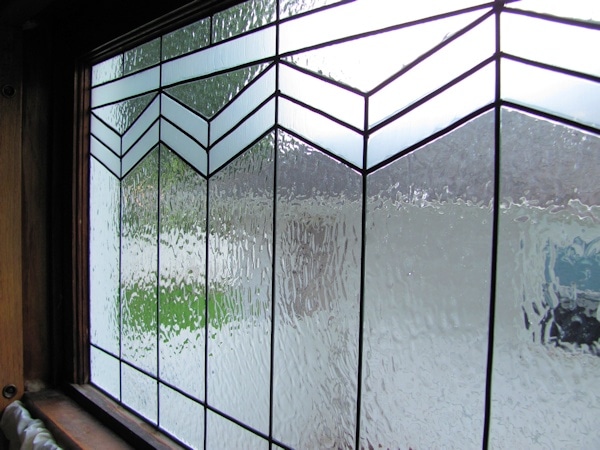
Once dry, I was amazed at how authentic the window looks. It adds beautiful character to the room and does the job of obscuring the not-so-nice view we had before.
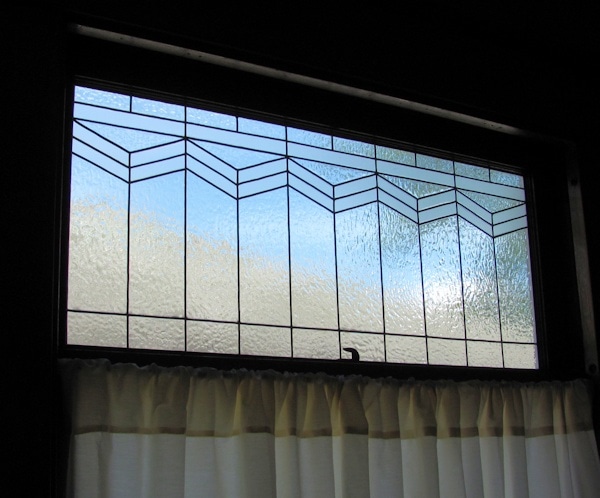
It appears a little less authentic from outside, since it doesn’t have the texture of a real leaded glass window, but it still looks very attractive.
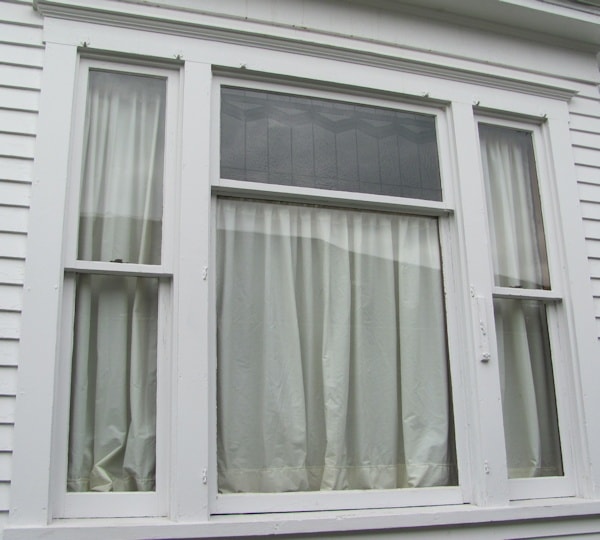
One little problem I’ve noticed is that on very rainy days my clear paint will cloud up a bit due to the moisture. I guess my windows are not sealed well. Not to worry, though — it clears right back up as soon as the moisture is gone. This is a known issue with Gallery Glass, and something to be aware of if you want to use the products in a humid area (like a bathroom).
If you’d like to add some historical character to your home, these Gallery Glass products are a great way to create convincing faux leaded glass. So often cheap solutions look just that, cheap. This really works, and I think it looks infinitely better than ready-made window film.
If you get sick of the look, or just need to remove it for some reason (maybe you’re renting), the paint is completely removable — it peels off just like window film once it has cured. If you make a mistake, you can cut out one section and try again. It’s very user-friendly, cleans up with soap and water, and doesn’t give off noxious fumes.
I’m so excited that I discovered this solution, and I hope the information helps if you want to tackle a similar leaded glass or stained glass project in your own home.
P.S. Here’s an impromptu video I made while I was working to give you a better idea of the process while it was in progress (including my noisy baby):

Truly beautiful, Jen! You are really talented. And all for $20. Amazing.
Thank you! I’m excited it worked out so well.
Jennifer, that’s awesome, and wow, that’s low cost. Thanks for sharing, the window looks great!
Thanks, Josh!
I’ve always wanted to do this. I remember as a kid watching some informercial on this. Looks really great.
Haha, cool! Somehow I had no idea this stuff existed until recently. Thanks for reading.
Jen,
This looks great and completely kicks the pants off my double-sided tape and wax paper solution! Our old houses must have been built around the same time. Our dining room window looks directly into our neighbor’s kitchen. We aren’t related though 🙂
Thanks, Sara! It’s funny, I like living in the “city”, but lack of privacy drives me batty. From what I’ve seen of your house, it does seem similar, and I think our taste in decor is, too 🙂
Nice window Jen. That’s pretty impressive because you have done it with $20 only. Great job!
Thank you, Hannah!
Great job Jen! Unbelievable, for less than $20 and with a few hours of work, you were able to create a beautiful window design!
Thank you, Marie!
That is simply amazing. Beautiful job. Thanks for this idea!
Thank you, Erin!
A few years ago my husband and I had a crafter—which we are not—add a similar type of stained-glass look to three of our windows for the same reasons you added yours. I think if we’d had your excellent, step-by-step tutorial to guide us, we’d have tackled the job ourselves and been money ahead. Your window is lovely. I especially like the way it resembles the original windows.
Thank you! It may have cost you more, but I think it’s nice that you were able to give someone the opportunity to use their talents to make money.
Fabulous!!! I’ll be doing this very soon with some transom windows in our new nursery. Holy cow does this look great!
Thanks, Becky! I bet your nursery is going to look awesome. Have fun!
Wow, that is SO COOL! I’m currently painting and painfully remodeling my house now and I might do that for my kitchen windows for privacy. Thanks for the tips!
Sam
Thanks for stopping by, Sam, and good luck with your house projects!
I stumbled across this tutorial and immediately wanted to try it! The front door on my 1925 bungalow has a clear glass window in the top third. When we first bought the house there was an old, frilly curtain covering it. We took that down but soon realized that it would be nice to have something obscuring visitors’ ability to peer right into the house. I decided to use your technique on a double glass 16X20 picture frame, suspending it from the curtain rod that once held the curtain using small chain link. I’m hoping this will look like a leaded glass section hanging in the window. Currently, I’m waiting for the liquid lead joints to cure. So far so good! Your instructions and video made this project very attainable! Thank you so much for sharing your great idea!
Thank you, Chris! It’s always so nice to know I’ve helped someone out. It sounds like the perfect spot for some leaded glass, and I’m sure your project is going to turn out great. If you’d like, feel free to send me some photos when you’re done–I’d love to feature your finished work on the blog.
je*@je*******.com
This was a great video! I’m going to try the pebbled texture today. I loved the baby noises too….very cheery!
Thanks, Joni!
I want to do the same with my kitchen cabinets and want to know if apply on the glass on the inside or on the outside. Your windows are beautiful. Thanks
You could do it either way. If applied on the inside, you wouldn’t have the nice three dimensional quality, but it would be much easier to keep the smooth surface clean. Good luck, and thank you!
Thank you! I have been trying to work out how to do stained glass windows in a folding gipsy caravan, and this is exactly the effect that I wanted. Perfect!
please could you tell me if the lead stripes are harms
full
Historical windows usually contain real lead, so yes, the leading on an old window may be harmful. However, the leading strips I used in this tutorial do not contain any lead and are completely safe to handle.
I have a garden house with French doors that have “blown” (moisture has gotten between the double panes). I’d like to camouflage the cloudiness with this technique, but want the lead to show from the outside. Are these materials weatherproof? I live in Virginia and we have cold winters.
Hi Marianne,
It’s difficult to say. My work is on a single-pane window and I’m in NY where we get sub-zero temperatures in the winter. So far the leading and the paint have stayed put (though it is installed on the inside). The paint clouds up a bit when it’s rainy outside due to moisture seeping in from the old wood, I guess, but it clears back up once it’s dry. I would think if it was exposed to the weather it might not hold up, but if your door is sheltered, it may be able to work. Perhaps Plaid (the brand who makes the supplies) could give you some insight?
thanks for answering so quickly! I will consult Plaid first, as there are two big doors and I’d need lots of materials for the project. I do know there are lots of homeowners out there who have inherited blown windows and this might be an inexpensive (and beautiful!) fix.
I wanted to try this with the windows on top of and surrounding our front door. I would rather it look better from the outside. (Would need to apply to the outside of window) Do you think this product would be able to withstand the elements? Thanks!
Sorry, just saw Marianne Lee’s comment.
i LOVE this! i have like huge sliding glass doors, so wish me luck … also, where did you look to get specific old timey glass designs/ideas – like did you just google for images and take it from there?
Yes, I just did a Google image search for things like “leaded glass” and “craftsman leaded glass”.
one more question: do you know of a website or a program or an instructional site where it translates dimensions? .. i know it’s just a matter of being able to do math, but i’m hoping there is something easier so as to ensure no mistakes are made. for example: if i find a cute design on a window that’s like 3 ft X 2ft., is there something where i could put in my dimensions of like a huge 7 ft X 4ft window, and then it would ABC me on the steps? Like i said, i know it’s just simple math – but is there anything else that you know of which could aid me? Thanks
Sorry, I don’t know of anything that would enlarge and lay out the design for you. If you need help doing the math with exact dimensions, though, you could try http://www.wolframalpha.com It’s basically a fancy calculator and you can type in any kind of units and get exact answers. Good luck!
Thank you, Jen! I can’t wait to try. You rock
Thank you 🙂
I used your technique to do the upper window in my bathroom (we have shutters on the bottom) and it turned out fantastic. For anyone wondering how it holds up in a humid area, it looks milky/cloudy after a shower but goes away as soon as the steam dissipates. I have noticed along the bottom I have a couple spots where the Gallery Glass has chipped off. It is an easy fix! Just requires a razor blade to scrape that portion back down to glass and reapply. It lasted almost a year before these chips showed up.
Thank you for sharing, Kim!
I am SO HAPPY I found this DIY. Our 1926 house had a wall air conditioning unit put in a small window in our living room eons ago. The previous owner installed central air more than a decade ago, and just left the ancient a/c unit in the wall. It is so ugly and I have been searching high and low for a leaded glass window to restore this window. The other houses in my neighborhood have the small leaded glass windows just like, so I am sure it is what was originally there. It’s too bad they didn’t keep it. (I’ve checked my attic, which does have a few other original house “parts”.
Now I am going to get a newer/less drafty window to install, and do this! I cannot wait to tell my hubby. 🙂
I’m sure it will look great. Have fun!
FANTASTIC! Thanks for sharing all the details of your step-by-step process as well as a video.
Just wondering if all you needed for that large window was the 2 oz bottle of Crystal clear? I am planning on doing this for a cabinet turned into pantry and want to hid all the canned foods behind. But I thought I would need the 8 oz bottle.
So sorry for the late reply! I can’t recall exactly how much I ended up using, but I think it may have been 2 of the 2 oz. bottles. I couldn’t find the larger bottle locally. Definitely better to err on the side of more if you have a large window to do.
How well does this clean? Can you wipe it down with a glass cleaner or is this a “lookie-lookie-no-touchy” sort of craft?
I think you could very carefully clean with a glass cleaner, wiping gently. It’s fairly durable.
I think you were first cousins twice removed. I am definitely going to try this but I would like to do it on the outside of the window rather than the inside do you think that’s possible? I’m thinking of using it on garage door windows but I’ve already ruined the inside of the window with that spray frosting that never quite worked out. So I’d like to retry this on the outside of the window.
It depends on where you live. The products won’t do well exposed to moisture and temperature extremes.
Love your idea as we have a beautiful bay window that looks out at side of our neighbors house and his junk truck in the back yard. I have newer windows with a white grid between the panes. This is not our forever home so I am leery of putting the gallery glass directly on our insulated windows and possible hurting out resale value of our home or worse have to replace them if it doesn’t turn out. My question is if I want to remove this years down the road, is it possible and how easy would it be to do?
I do not have personal experience with removing it, but I understand that it is meant to just peel off. People use this product to make reusable window clings. To protect the window frame, I would use the leading lines along the edges of the window. When it’s time to remove, start with the leading lines. You can use a utility knife if needed to cut the seal between the leading and the Gallery Glass paint. Hope that helps!
You did a great job and I’m so glad you shared the process!
Thank you!
I am dying to try this. It looks so good! Beautiful job, and very clear explanation.
By the way, if your mother’s cousin is her first cousin (child of your mother’s aunt or uncle), then the cousin’s son would be your mother’s “first cousin once removed,” and your second cousin.
I’m just throwing that in there to show off.
Haha Mark! Thanks for clearing that up 😉 And thank you! You should definitely try it sometime — it’s fun to do.
Your window looks AMAZING… I’ve used this product before and it’s been a while. Your project was a perfect refresher course. THANKS…. I did my projects on French doors and they looked stunning. Now I will be created a wall divider with glass inlays and I’ll be doing a Prairie look similar to yours.
Congrats again on your project. Your home looks lovely…..
Thank you, Michael! Good luck with your latest project!
This look is exactly what I’ve been looking for. I love it! I have just one question tho’….. Is the clear frost paint necessary under the Crystal Clear or do you think just the Crystal Clear would be enough to do the job? And if necessary, do you know if it’s possible to just use the spray frost made by Rustoleum?
I found the answer to my own question by watching the video. I was thinking that you put the frosted paint under the Crystal Clear, but now I see that wasn’t the case. Anyhow, thanks so much for your tutorial…. You did a fantastic job and I can’t wait to try it in my bungalow. I know it will be the look I’m wanting.
Thanks! Have fun with your project!
I’m thrilled to have come across this! Please answer if you can. I was thinking of doing this treatment to some cabinet doors. Should I do it on the inside so that I can clean the outside? Of course, it loses some of the visual effect by doing it on the inside. I could lead the outside and do the texture thing on the inside, maybe? Or do everything on the outside and don’t clean the glass?? Will a damp cloth hurt the stuff? Is dust going to stick to it, or will it dust off with a dry cloth? I’m not really so dirty! But after a while might need to dust it!!?? Thank you!
If the cabinet is in the kitchen where it might get greasy and dusty, I would definitely do it all on the inside. I actually just did some in my kitchen that way, but haven’t had a chance to post yet. Otherwise I haven’t noticed dust being a problem on the windows I did. I would use a microfiber cloth to wipe down.
I love your project. How do I determine how much of the liquid color to buy? Also are you using 1/8″ lead strips? They look wider but I can’t find any strips wider than 1/8″.
Thank you! Yes, I used the 1/8″ strips. The smaller 2 oz. bottles of Gallery Glass cover approx 1 square foot. I would measure the overall area of the window and go from there. Sometimes you can find larger bottles, and it should give you an approximate coverage amount. I would buy a little extra just in case.
Jen, I want to use something like this for bathroom windows in a home I’m building for the privacy aspect. What is it you say about the moisture affecting the paint? Do you see a good way around it?
By the way, I like your blog. My wife and her sisters started one together called thisbluedress.com. If this word well we’d probably want to link to this article.
Thanks!
Moisture will cause clear paint to cloud up, the way it looks when wet. It will dry again and clear up, but it does affect the aesthetics while it’s damp. I’m not sure of a good way around it. If you have a well-ventilated bathroom and the glass doesn’t usually fog up, then it might not be much of an issue. Alternatively you could use a privacy film instead of paint, and then use the faux leading on top of that to get the look of a leaded window. Hope that helps!
This was the perfect thing for my French doors! I had that tacky window film on them & just hated it. I applied the gallery glass in clear with your technique & it looks awesome. My next project is my son’s room. He also has French doors & I’m going to use the frost on his. Thank you so much for making the video & showing your techniques! Your window looks amazing.
Thank you! I’m glad your project turned out awesome!
I attempted this on some old french doors and in some spots (where the paint was a little thick) the crystal clear is still a milky white, but it seems to be fully dried. It has been 3 days since I applied the paint and I was hoping it just needed time to fully cure, but I’m not sure it will end up being completely clear. Did you have any issues like that with your project? Your window looks great!
It may need some extra time to cure. The surface may be dry, but the paint underneath is still wet. I can’t remember how long mine took, but the the thicker areas were milky for longer. Mine is on an old window, and for some time the paint would turn milky again due to moisture. It always clears up. At this point I haven’t noticed that happening anymore, though.
He would be your second cousin. Or, first cousin once removed.( the removed applies to how many generations it is from the original first cousins)
I have worked with Gallery Glass b4, and really enjoyed it. I do have a question, however. Do you seal it in any way after you are done? I have noticed that it is possible to peel the entire design off after it is dry. Is there a way to protect it? Thanks
I haven’t sealed any of my projects, and I’m unsure what if anything could be used. It really seems to stay put well unless you have moisture issues. It won’t peel off unless you do it purposely.
Hello…I’m interested in doing my upstairs hall window using this process…but I was wondering about cleaning the windows after they’re done? Can you clean them without ruining the work?
I want to know how do you clean your window when it gets dirty? Also will this work on plexiglass?
Yes, it will work on plexiglass. The manufacturer recommends wiping down with a damp cloth to clean.
Hola! Es tu primo en segundo grado y el primo de tu madre es tu tío en segundo grado ajaaj lindo diy
Hi Jen. I see you used the 1/8″ wide lead strips. Like a comment just above, they definitely appear wider on your application. Did you double up to get a wider look? I just received my order today and when I saw how thin the strips were, I measured the lead width of the authentic stained glass windows in my house and they are at least 2/8″ thick, some even 3/8″ thick. If you did double up, was the seam obvious or not really. Thanks.
Hi Mike,
No I didn’t double them up. Maybe it’s my photography that makes them appear wider. Compared to the original leaded glass in my house, these lines are definitely “daintier” looking and I would have preferred a thicker line if I could find them. I’m not sure if you can make it out in the picture of the packaged leading, but you can see a faint line between the strips where they are cut. Maybe from a distance it wouldn’t be noticeable. I would recommend against trying to fill in the seam with the liquid leading, as it dries a bit shinier than the leading strips.
Thanks for this! I plan to try it on my front door. I was thinking I would try a mirror image on either side of my door to help it look more authentic from both the in and outside. From your experience with this project, do you think it would affect the look much if I did it on both sides of the glass? My front door is protected by a storm door, so it wouldn’t get much weather on it at all. Thanks!
I’ve never done both sides like that, but I think it’s worth a try. It definitely looks flat and inauthentic from the outside if only the inside is done.
This looks lovely. I wonder if there is some kind of spray finish to set it all. If so, it might work outside. I’m thinking I’d like to do the design inside and outside…just so some texture is on both sides. I want to do a transom window, and I want it to look great if viewed from both sides.
How has your project held up over the years?
Overall it has held up well. I will need to update the post at some point to show some minor issues. My window was a less than ideal situation–it’s single-pane glass, and an old, drafty 100-year-old window. On rainy days or when there was otherwise condensation, the Gallery Glass would cloud up a bit, and then eventually dry again. But going through that over and over through the years, some areas have become brittle and in some areas actually peeled off. The frosted glass areas and all of the lead lines have held up perfectly, so I would only need to go in and replace a few of the “textured” clear glass sections, which is easy to do. So, I’d say pretty good, considering!
The easiest way to lead is to make an actual size pattern, tape onto the opposite side of the glass & lead over the lines on your pattern.